LG TV Hidden Service Menu

- LGService.png (55.03 KiB) Viewed 92651 times
Access the service menu and enable features only available on high end models.
WARNING: Use caution when changing setting as it could become unusable.
Required Items:
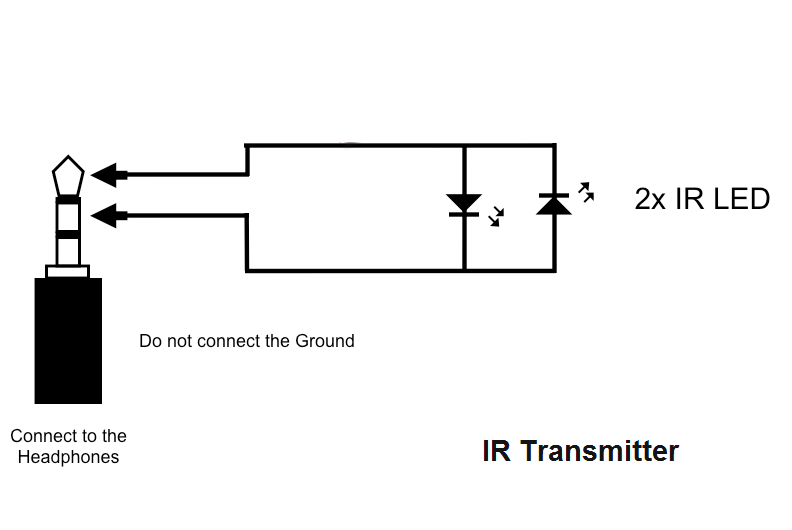
2 IR LED's (Can be taken from on old remote)
See Image
3.5mm headphone jack (Old headphones cable will work.)
See Image
Device that can play an MP3 File (iPhone, iPod, MP3)
Original Remote that came with your TV (Universal Remote will not work)
With this tutorial you will be able to access the hidden service menu on LG TV's (See List At The Bottom).
Once in this menu you can enable features on your TV that are normally disabled from the factory or only available in high end models.
This works by sending the required service codes to the TV with a simple improvised IR transmitter by playing a special file through the LED from an old TV remote.

- f7ce11e9_DSC01638.jpeg (2.04 MiB) Viewed 92651 times
Step 1: Create the IR Transmitter
Step 2: Load MP3 File To your device
Step 3: Plugin IR Transmitter point at the TV and play sound file on full volume
Step 4: TV may ask for password (0000 Or 0413) must use original remote to input the code
Step 5: Change Settings as you like (To avoid corrupting firmware power cycle TV after changing each option)
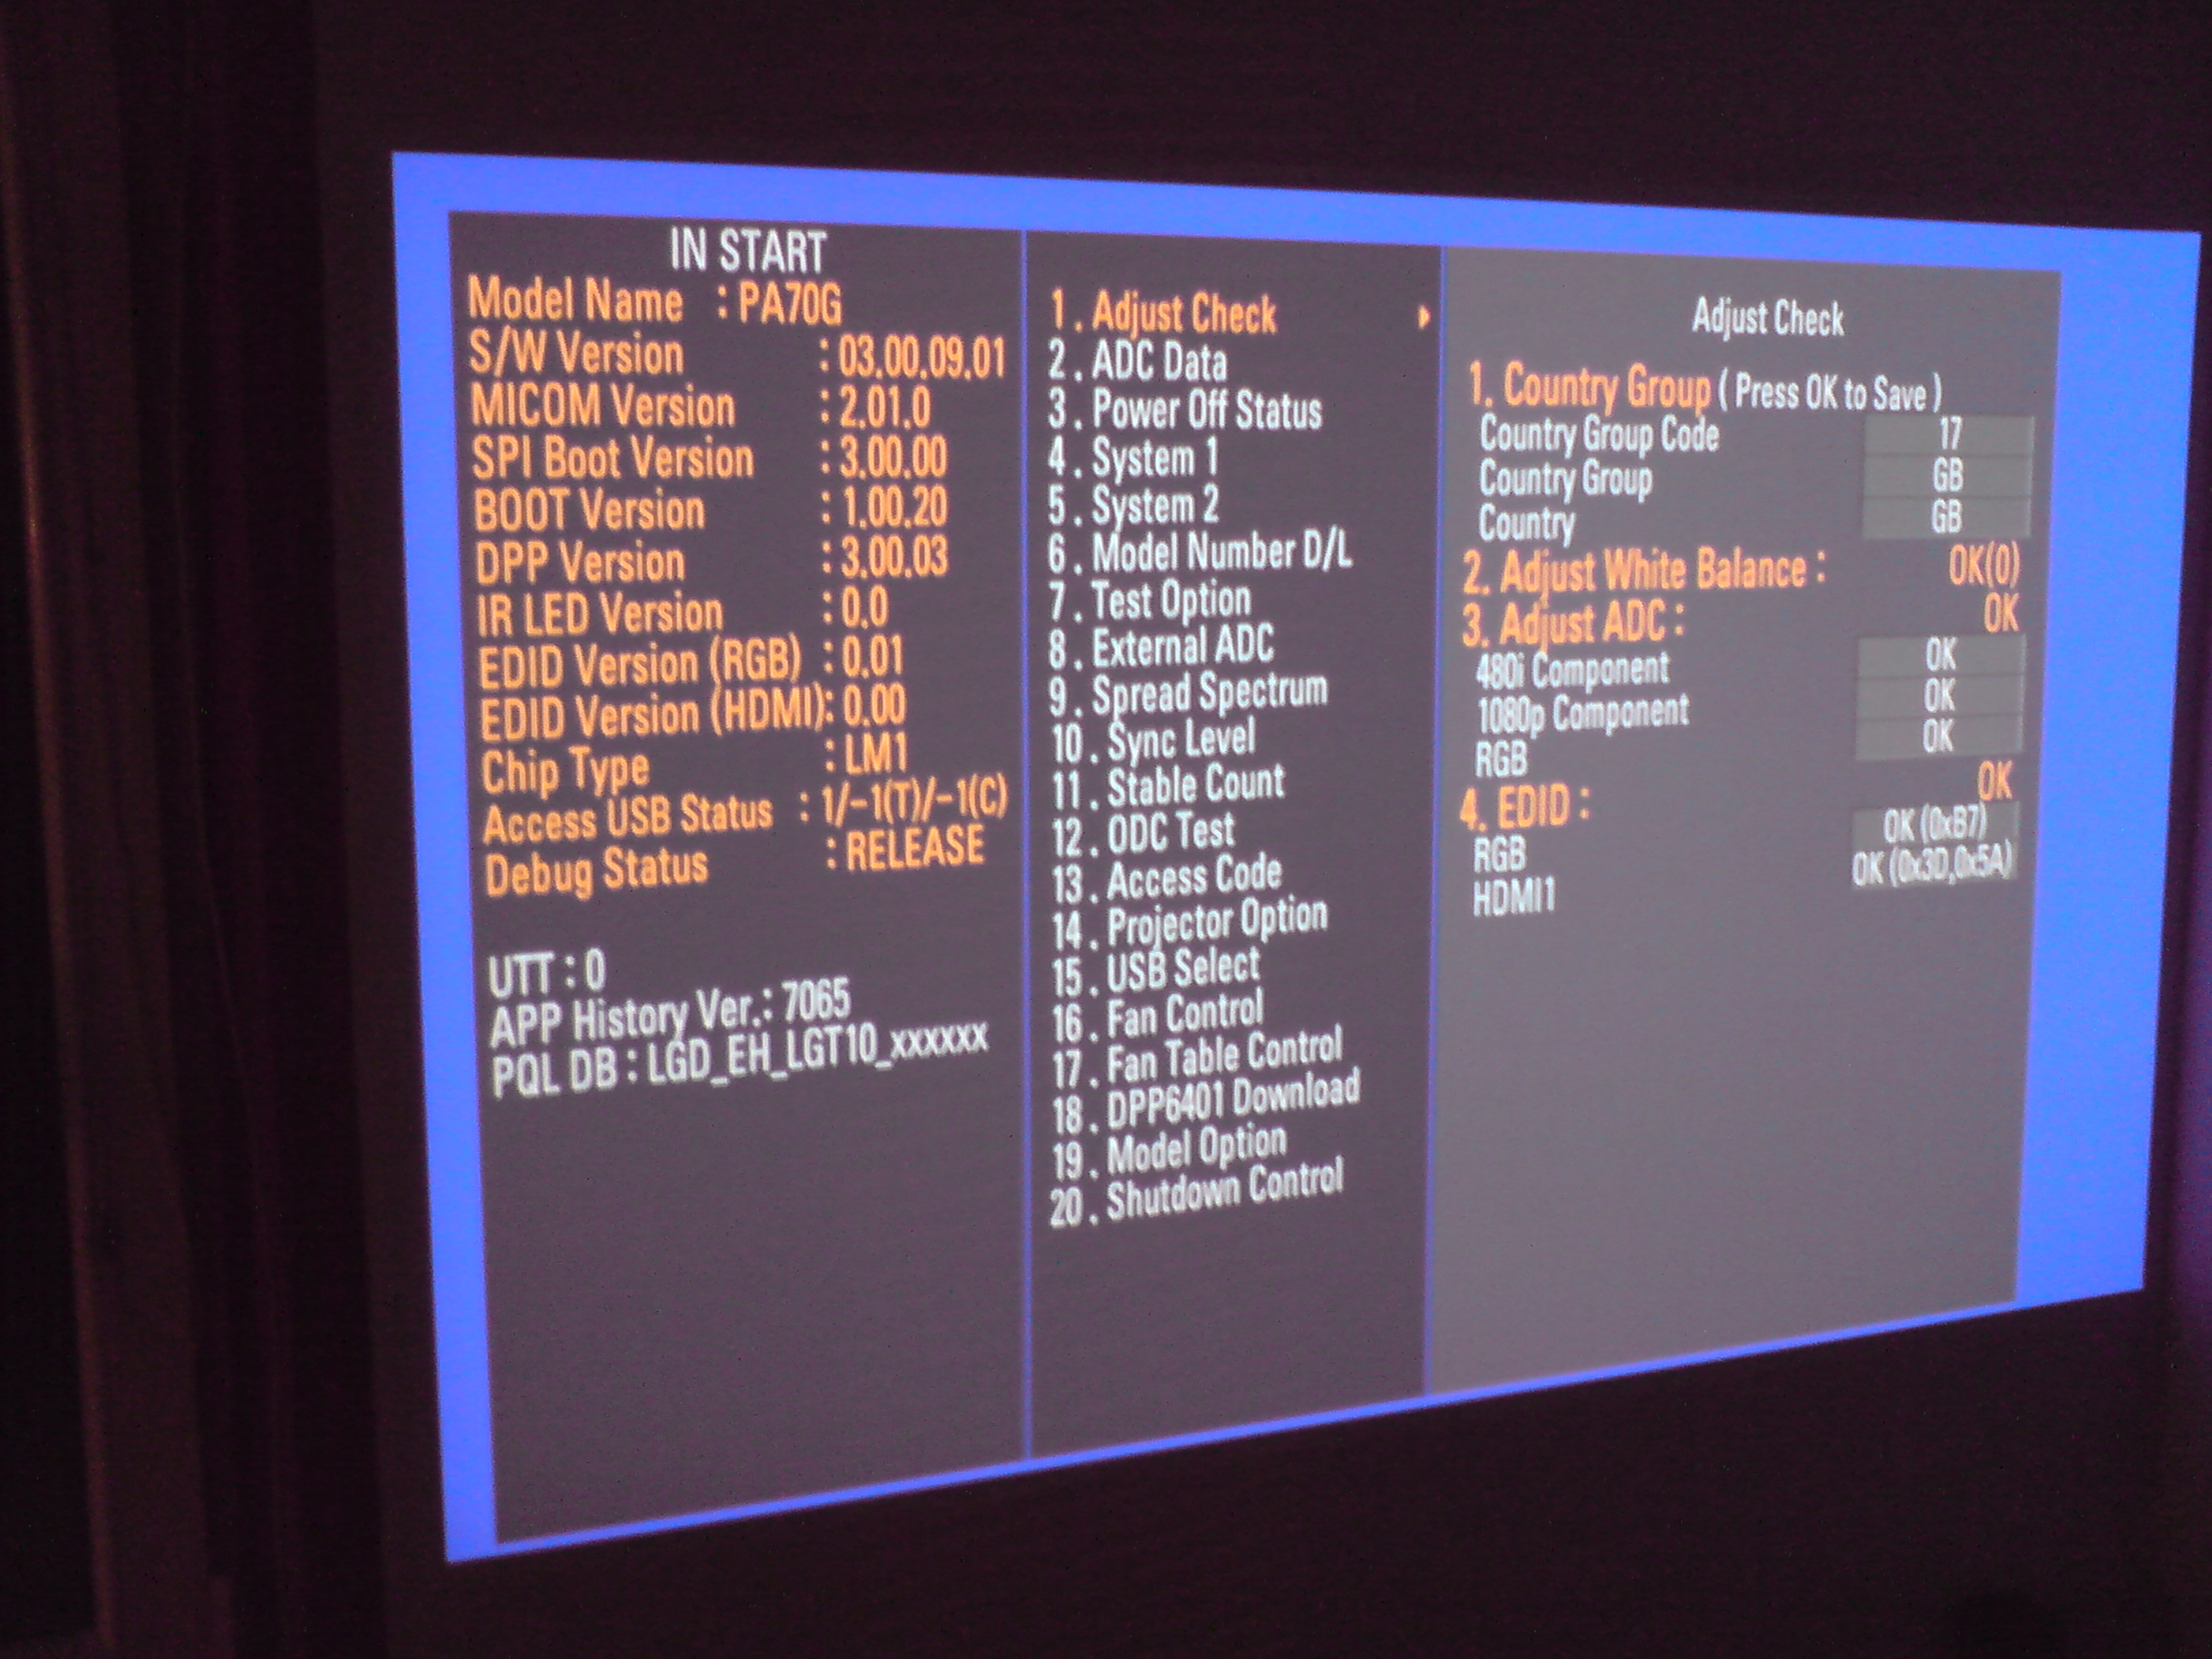
There are 3 Audio Files one for 3 Possible Modes:
Code: Select all
[b]EZ_ADJUST[/b]
Simplified In_Start menu.

[b]IN_START[/b]
Advanced Settings Menu.

[b]POWER_ONLY[/b]
In Power_Only mode, the screen will go to a white screen saver.
To exit Power_Only mode, press "Back," change Input and Power Off/On.

- HeadphoneIR.png (21.7 KiB) Viewed 92651 times
Known Compatible TV's:
Code: Select all
LEX8, LZ9800, LZ970, LZ9700, LZ9600, LW9600, LW950,
LW9500, LW770, LW7700, LW7500, LW650, LW6500, LW570,
LW5700, LW5600, LW550, LW5500, LV570, LV5700, LV550W,
LV550T, LV5500, LV5400, LV375, LV373S, LV372S, LV3700, LK550,
LK530, PZ950, PZ570, PZ950, PZ950, PZ750, PZ550, PZ540, PZ950,
PZ570, PZ950, PZ750, 32LV3730, and all models produced in 2011
Code: Select all
I have a 47LW5700 I added features available on the LW5600 model.
Changes i made:
Turn on local dimming
Add THX & ISF Audio/Video Options
Enable Channel Thumbnails
Enable DVR Feature
Enable 5.1 Surround Output From Optical Out

Steps:
In EZ_SETUP
-Tool Option1 --> Set Tool = LW56 (change the TV to a LW5600)
-Tool Option2 --> Set LocalDim Menu = 1 (This turns on the menu item)
-Tool Option4 --> Set local dimming =1 (This turns on Local dimming)
-Tool Option3 --> Set THX = 1 (This enables THX Video/Audio Options)
-Tool Option3 --> Set ISF = 1 (This enables ISF Video Options)
-Tool Option3 --> Set DVR Ready = 1 (This enables DVR Feature)
-Tool Option5 --> Set Channel Browser = 1 (This enables Channel Thumbnails)
-Select AC3 EDID D/L --> Press start (This enables 5.1 AC3 Output thru Optical)
► extra non-formatted info
EZmenu Note to accomplish this on my tv I used my brighthouse remote and used the info from the radio shack remote- just changed 9-9-4 to 0056 to match my remote as per their instructions-
Dont brick your tv- be conservative and reccomend you dont change anything you dont fully understand-
page 192-
Burninh2o
Member
Join Date: Jun 2009
Posts: 95
Quote:
Originally Posted by metalmyth1
Hi All
New member as well as new owner of a 47LW5700 and love to get all the bang for my buck. Finding this thread I joined the forum and believe it or not read all 190+ pages I found alot of repeat questions and kept hoping that someone would take all the cool titbits and put them into one post, since no one has I decided I would.
If possible, when people find things out or things I may have missed please add to it and make things easier for everyone else and people just hooking into this thread....just a suggestion. What follows is not my knowledge just what I copied and pasted into a txt document. I didn't think to credit each person who posted and Im too much of a lazy ass to go back. To all those who's words I pasted here...
Thank you so much your knowledge it is greatly appreciated!!
Secret Menu:
WTH is this Secret Hidden Menu??? (EZMenu) in a nutshell there is a hidden menu that allows the LG factory to turn on and off features using a 1 or 0 value. Quite a few of the LG TV's can perform some of the higher end model functions as the architecture is almost identical.
Is there a risk...well of course, but it is like overclocking your PC don't be a Jackass and only turn on the features you have seen others discussing for your particular model # and you'll be fine. Turn on everything and you get what you deserve "Hello LG can I get an RMA #"
All LG service techs have a specialized remote control to access this hidden menu and if you want you can buy this remote:
Service Remote:
www newtvremotes.com/Mfrs/Zenith/ZenithTV/105-201M.htm
If your a cheap ass like me you can buy a cheap Universal remote or use the Harmony Remotes (Personally I have the Harmony 880) either way the procedure for either is here:
Poor Mans Service Remote Procedure:
http openlgtv.org.ru/wiki/index.php/Access_hidden_service_menus_/_modes
Great Metal, so I went to the link, configured a remote, accessed the menu...now what?
As an example I own the 47LW5700 it's higher end brother model the 47LW5600 which has Local Dimming so by going into the menu and going to:
Password = 0413 or 0000 (use the original remote to navigate and enter values)
Option 1 goto> tool >change to lw56.
This will fool the set into thinking it is now an LW5600, Next:
Option2 goto> localdim menu =1 (This turns on the menu item)
Finally:
Option4 local dimming =1
For saftey and not to corrupt the firmware, after any change exit the menu (simply click the button you programmed to access the menu to bring you back out) wait 10 seconds, power off the TV and wait 20
seconds then power the TV back on...you have now basically turned the 5700 into the higher end 5600...cool eh?
Here some other very cool tweaks you can turn on:
Option3 thx & isf setting=1 (Adds the THX & ISF video mode like higher end models have. Not available on DLNA/MediaLink)
Option 5 Channel Browser Set to 1 to enable preview thumbnail grid of all channels, it may not work on US cable, noticed when enabled Korean words show up in the menu?
option5 or option 6 (depending on your specfic model) 3d thx=1
Word to the wise : DO NOT SELECT THX MEDIA DIRECTOR ON ANY LCD TV IT CAN DESTABILIZE YOUR TV IT'S USED ON PDP.I WOULD NOT LEAVE IT ON IF YOU'VE DONE SO.
3D:
Personally I love pop out 3D, to me that's what 3D is all about and also what made this TV so impressive. If in the above example you enabled THX 3D.....while watching a 3D movie hit the normal Quick Menu button you now have a 3D specific menu (Only available while 3D is active) Click Quick Menu, Click Set video, Scroll through pic mode(s) select "thx 3d"
As a starting point for 3D:
Picture mode: Standard
Backlight: 80
Contrast: 100
Brightness: 50
Sharpness: 50
Color: 55
Tint: 0
Color Temp: 0
Dynamic Contrast: Medium
Dynamic Color: High
Clear White: Off
Skin Color: 0
Noise Reduction: Low
Super Resolution: On
MPEG Noise Reduction: Low
Gamma: Medium
Black Level: Low
Eye Care: Off
Real Cinema: On
Color Gamut: Wide
Tru Motion: Off
LED Local Dimming: Medium
Energy Saving: Off
change between Daytime & Nighttime viewing the key is "Backlight".
Night = 28
Day = 80-90
2D:
Energy Saving: Off
Picture Mode: Expert1
Backlight: 28
Contrast: 89
Brightness: 52
H Sharpness: 50
V Sharpness: 50
Color: 50
Tint: 0
Expert Control
Dynamic Contrast: Off
Noise Reduction: Off
MPEG Noise Reduction: Off
Super Resolution Off
Black Level: Low
Real Cinema: On
Color Gamut: BT709
Edge Enhancer Off
Color Temp: Warm
Gamma: 2.2
Method: 2-Point and 10-Point
Pattern: Outer
2-point
Contrast: Red -6, Green 0, Blue -34
Brightness: Red 2, Green 0, Blue 1
10-point
20IRE: Red -1, Green -1, Blue 0
30IRE: Red -1, Green 0, Blue -1
90IRE: Red -5, Green 0, Blue 0
100IRE: Red -9, Green 0, Blue 0
All Others: Red 0, Green 0, Blue 0
Luminance All 130
CMS settings: Color Tint
Red 0 -3
Green -4 17
Blue 0 0
Yellow -17 -2
Cyan 0 0
Magenta 0 0
Sound:
Unfortunatley LG is too much of a cheap ass to pay DTS their licensing fee... so DTS does not get processed nor passed thru...it gets blocked. AC3 or Dolby Digital on the other hand can be passed thru to enable this:
EZ Adjust menu, scroll down to the "AC3 EDID D/L" menu item and press select on the remote.
A sub-menu will appear. You want to press select on the "Start" menu item. It will sequentially go through the list of inputs and enable AC3.
After it's done (takes seconds), it will say "OK". At that point, exit the menu (simply click the button you programmed to access the menu to bring you back out) wait 10 seconds, power off the TV and wait 20 seconds then power the TV back on.
For a small number of users AC3 playback using optical to a home theater amp they had to engage the audio sync option in the LG setup for a particular source, because the lip sync was off. In one report turning the sync all the way to the left to match the audio was the fix...again this doesn't happen to everyone.
Another reported fix is as follows:
For those of you having a lip sync problem or no luck passing ac3 after running the write on this ....try this:
A. unplug all cables from inputs..hdmi/optical etc...
B.erase the AC3 write to NG..goto AC3 EDID D/L >hit reset >see ng >unplug cables
C.re-write your AC3 EDID D/L ...WITH CABLES OUT! goto AC3 EDID D/L >hit start >verify ok >exit menu
D.IMPORTANT ...make sure any external device..ps3/set-top etc..is on before you reconnect the device ...I looked at the electrical schematics for this board it has a flash loader IC which needs to recognize 5 volts after writing to enable correctly, this does not always happen precisely when a cable is already connected..
Roll back firmware...
(From the standard remote)
Press Home
Choose Setup
Highlight the Option Menu...The tool kit icon should be highlighted
Press the 9 button 6 times
It will automatically rollback and reboot.
DVR:
This TV has build in DVR functionality...all you have to do is supply the external USB drive. Basic instructions:
As always to get the really cool stuff "EZ Adjust menu"
Option 3 goto> DVR Ready Set to 1 (this enables Time Machine for dvr like functions on USB just need an external usb drive (not a stick) on usb port 1
Plug in the drive...if it asks you if you want to use it, say no.
Then go to the home screen, with 2 right arrow clicks you get into screen with time machine app,
Enter in it and in it it shows new screen with prompt to start initialize process, you say OK and it formats drive - after that it becomes active but in that screen there is no scheduler/recorder - confusing.
Go into regular program view mode, press quick menu and in the bottom line it should show time machine app box - and when you enter it it will open up recording option, scheduler, etc. Under inputs you now will see your USB and clicking it will show time machine screen and you can play those recordings.
Note: If you pick up via OTA broadcasts it should work like a normal DVR, problem that I am having is my Digital cable box connects via HDMI and recording is prohibited via HDMI further if I try to use the Cable signal normally it prevents analoge recordings. It has been hinted that using the EZ menu to change the country code and group (DVR Function is enabled only for certain countries: FI, SV, N, DK, ES, RU, UA, KZ, LT, EE, LV, CZ.) that the HDMI restriction may be bypassed it is also stated this can brick your TV.
I am in Canada and I would be forever in your debt if you could tell me how to saftley bypass this HDMI restriction.
Advanced Tweaking:
The secret to stopping the pic from distortion,you have to go into the "white balance"
I believe in option 6 and change it to "med
To change the white temp with picture wizard and make it stick in your settings:
CANNOT MAKE IT STICK WITH EZ MENU THAT IS ONLY TO
ADJUST THE WHITE VALUE FOR PICTURE WIZARD..EG..RED,GREEN BLUE DRIVE. WHEN YOU GOTO EZ MENU YOU ADJUST HOW THE TEMP WILL BE DISPLAYED IN PIC WIZARD,i SAW ALOT OF RED SO I ADJUST RED DRIVE-CUTOFF AND NOW THAT'S THE WHITE I GET IN PIC WIZARD ON MEDIUM.
IF YOU DO NOT LIKE THE WHITE IN EACH SUB CATAGORY IN EZ MENU YOU ADJUST THE DRIVE-CUTOFF THERE AND HIT "TO SET" TO CHANGE THE
WHITE VALUE YOU SEE ON THE SCREEN IN THE WHTE BALANCE OPTION IT THEN CHANGES THAT THE VALUE IN PIC WIZARD.
WHEN CHOOSING YOUR WHITE SETTING IN PIC WIZ GOTO THE PREFERRED OPTION AND CHOOSE MEDIUM THERE IT CHANGES THE ON SCREEN WHITE
TEMP,IT WILL ALWAYS DEFAULT TO COOL FIRST IN THE EZ MENU THAT DOES NOT MEAN YOUR PICTURE WHITE IS COOL IS IT WHATEVER YOU SET
IN THE WIZARD FOR VIEWING........IF YOU CHANGE THE CUTOFF OR DRIVE IN THE EZ MENU WRITE YOUR VALUES DOWN BEFORE CHANGING WHEN YOU
HIT "TO SET" THE EPROMM WRITES AND CHANGES IT FOREVER"
IF YOU EVER WANT TO REVERT TO FACTORY WHITE BALANCE YOU'LL HAVE THE ORIGINAL SETTINGS YOU CAN CHANGE THEM, AND RE-WRITE TO THE EPROMM.
The above post changes white for expert,standard etc..pic settings to change white in the thx mode here you go........................................
A.Set thx pic mode>when in thx and you see all greyed out hit 8741 on remote and the option are opened bright,contrast,advanced options
B.goto advanced options in thx mode
C.goto color temp in advanced options choose medium
D. The red is gone!
You can get into the sub b/c in the ez menu to address the contrast issue and if you use expert pic settings:
Goto advanced>yellow color yellow tint without having a color analyzer you can stand off angle and adjust them to rectify the yellow saturation use tint first! anyone using advanced should use bt709 gamut for an lcd make sure you use that if you use expert.
Luminance will need to be at least 150 it does vary according to the ambient light condition but 150 is a sure bet,if you want to use a standard pic setting
try the clear white(on) and skin color negative.I really would advise to enable your white setting in the pic wizard setting the white temp in the ez menu.
Turning it off can corrupt your software,then you have to take the back of the tv off and reset it on the motherboard......I would also recommend adjusting your pic settings on expert and kicking the yellow color -30 yellow tint-28 you'll have super clean white even @ an angle
General Info:
Real Cinema is not available for progressive scan content.